Louisware Digital Caliper Manual PDF: Complete Guide to Setup, Usage, Features, Troubleshooting, and Measurement Accuracy
Introduction to Louisware Digital Caliper Manual PDF
The search term louisware digital caliper manual pdf is often used by people who have purchased a Louisware measuring tool and want clear instructions for setup, operation, maintenance, and troubleshooting. A digital caliper is one of the most useful tools for anyone working in engineering, machining, woodworking, jewelry making, automotive repair, laboratory work, DIY home projects, and educational environments. Unlike a standard ruler, a digital caliper provides precise measurements with a digital display that is easier to read and faster to use.
Many users misplace the printed instruction sheet that comes in the package, which is why they later search for a replacement guide or manual. Others want to understand how to switch between inches and millimeters, how to zero the tool, how to replace the battery, or how to avoid inaccurate readings. This detailed article works as a practical replacement for a traditional louisware digital caliper manual pdf by explaining everything in a simple and organized format.
Whether you are a beginner or an experienced technician, understanding how your digital caliper works can help improve accuracy, save time, and reduce mistakes. This guide covers the main functions, buttons, parts, measurement methods, care instructions, and common problems users face.
What Is a Louisware Digital Caliper?
A Louisware digital caliper is a handheld precision measuring tool designed to measure internal dimensions, external dimensions, step dimensions, and depth. It uses a sliding jaw mechanism and an electronic display to show measurements instantly. Many Louisware calipers include stainless steel construction, a clear LCD screen, metric and imperial unit conversion, and a compact portable design.
Digital calipers are preferred because they remove the guesswork of reading tiny engraved scale marks. Instead of estimating lines on a ruler or vernier scale, the user receives a direct numerical reading. This makes the tool ideal for situations where precision matters, such as checking bolt diameters, pipe thickness, drill bit sizes, jewelry dimensions, and material thickness.

The popularity of the louisware digital caliper manual pdf search shows that users value clear guidance and want to maximize the usefulness of their tool.
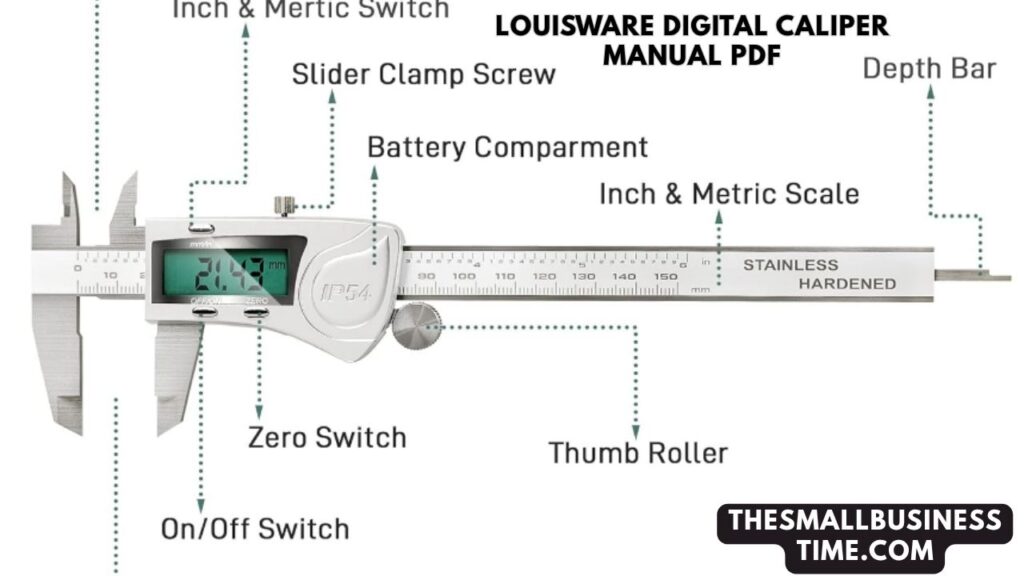
Main Parts of a Louisware Digital Caliper
To use the tool correctly, it helps to know the common components found on most digital calipers.
Outside Measuring Jaws
These are the larger jaws used to measure the outer width, thickness, or diameter of an object. For example, they can measure a coin, rod, bolt, or wooden board thickness.
Inside Measuring Jaws
These smaller upper jaws are used for measuring internal openings such as holes, slots, pipes, or the inside width of a container.
Depth Rod
A thin rod extends from the end of the caliper when the slider moves. It is used to measure hole depth, slot depth, or recess depth.
Main Scale Beam
The beam is the long body of the caliper that supports the slider and measurement system.
Slider
The slider moves back and forth along the beam and carries the digital display and movable jaw.
LCD Screen
The display shows the measurement value in digits for easy reading.
Buttons
Most models include buttons such as:
- ON/OFF
- ZERO
- mm/inch
- HOLD (on some versions)
Lock Screw
Some calipers have a locking screw to hold the slider in position after measuring.
Understanding these parts is an essential section of any louisware digital caliper manual pdf.
How to Set Up the Caliper for First Use
When opening a new caliper package, follow these steps before measuring.
Step 1: Inspect the Tool
Check that the jaws open and close smoothly. Ensure there is no shipping damage.
Step 2: Remove Battery Tab
Many new calipers include a plastic battery saver tab. Remove it before turning the device on.
Step 3: Install or Check Battery
Open the battery compartment and confirm the battery is seated correctly. Most models use a button cell battery.
Step 4: Clean the Jaws
Use a soft cloth to remove any dust, oil, or protective coating.
Step 5: Turn On the Device
Press the power button. The screen should activate.
Step 6: Close the Jaws Fully
Bring the jaws together gently without forcing them.
Step 7: Press Zero
Once fully closed, press the zero button so the display reads 0.00. This ensures accurate measurements.
These basic startup steps solve many beginner issues.
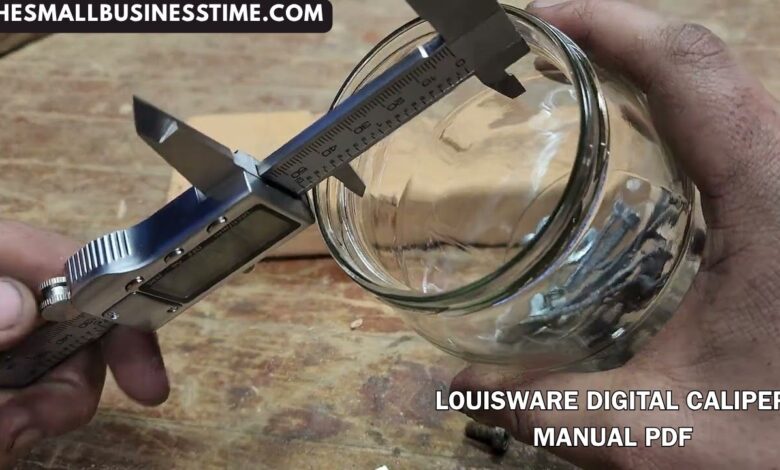
How to Measure External Dimensions

External measurement is one of the most common uses.
- Turn on the caliper.
- Close jaws and zero the display.
- Open the outside jaws wider than the object.
- Place the object between the jaws.
- Gently close the jaws until they contact the object.
- Read the display.
Do not squeeze too hard. Excess pressure may distort the object or affect accuracy.
Examples include measuring:
- Coin diameter
- Bolt thickness
- Pipe outside diameter
- Board thickness
- Washer size
How to Measure Internal Dimensions
Internal dimensions require the upper jaws.
- Insert the inside jaws into the opening.
- Open the jaws until both sides touch the interior walls.
- Keep the tool straight.
- Read the display.
Useful for:
- Pipe inside diameter
- Hole width
- Slot opening
- Bearing inner size
This is another reason many users seek the louisware digital caliper manual pdf, especially when using internal jaws for the first time.
How to Measure Depth
Depth measurement uses the extending rod.
- Place the flat end of the caliper against the top surface.
- Extend the depth rod into the hole or slot.
- Keep the base flat and level.
- Read the result.
Applications include:
- Hole depth
- Groove depth
- Recess depth
- Container depth
How to Switch Between Inches and Millimeters
Most Louisware digital calipers include a unit conversion button.
- Turn on the device.
- Press the mm/inch button.
- The display changes between metric and imperial units.
Use millimeters for engineering precision and inches for projects using imperial measurements.
How to Use the Zero Function
The zero button is one of the most useful features.
Standard Zeroing
Close the jaws completely and press zero.
Relative Measurement
You can zero the tool at any position. For example:
- Measure thickness difference
- Compare step height
- Measure variation between two objects
This feature makes digital calipers more versatile than basic rulers.
Battery Replacement Instructions
If the display fades, flickers, or stops working, replace the battery.
- Turn off the caliper.
- Open battery cover.
- Remove old battery carefully.
- Insert new battery with correct polarity.
- Close cover.
- Turn on and zero the tool.
Always keep spare batteries if you use the tool frequently.
Common Accuracy Tips
A digital caliper can only be accurate when used correctly.
Keep Jaws Clean
Even tiny debris can create measurement errors.
Zero Before Use
Always zero after powering on.
Use Gentle Pressure
Too much force changes readings.
Keep Tool Straight
Misalignment creates false values.
Measure Multiple Times
Repeat measurements to confirm consistency.
Store Properly
Protect from drops, dust, and moisture.
These habits improve long-term performance.
Common Problems and Solutions
Many issues can be solved quickly without replacing the tool.
Display Does Not Turn On
Possible causes:
- Dead battery
- Incorrect battery installation
- Dirty battery contacts
Solution:
Install fresh battery and clean contacts.
Numbers Jump Randomly
Possible causes:
- Low battery
- Dirt on beam
- Moisture or static interference
Solution:
Replace battery and clean tool.
Reading Will Not Zero
Possible causes:
- Jaws not fully closed
- Dirt between jaws
- Slider issue
Solution:
Clean jaws and close gently before zeroing.
Inconsistent Measurements
Possible causes:
- User pressure variation
- Misalignment
- Dirty surfaces
Solution:
Use consistent technique and recheck setup.
Buttons Not Responding
Possible causes:
- Weak battery
- Internal fault
- Moisture damage
Solution:
Replace battery and dry tool if exposed to moisture.
A practical troubleshooting section is one of the most important parts of any louisware digital caliper manual pdf.
Maintenance and Cleaning Guide
Proper maintenance increases lifespan.
Daily Care
Wipe jaws and beam after use.
Light Lubrication
Use a small amount of machine oil on the sliding beam if movement becomes rough. Avoid excess oil.
Dry Storage
Keep in a case or drawer away from humidity.
Avoid Drops
Impact may damage internal electronics or jaw alignment.
Remove Battery for Long Storage
If not used for months, remove the battery to prevent leakage.
Who Should Use a Louisware Digital Caliper?
This tool is valuable for many users.
DIY Users
Perfect for home repairs and custom projects.
Mechanics
Useful for checking parts, bolts, brake components, and tolerances.
Woodworkers
Measures thickness, groove depth, and fitting dimensions.
Students
Excellent for science labs and technical training.
Jewelry Makers
Measures rings, beads, stones, and wire sizes.
Engineers and Technicians
Essential for precise component inspection.
Why Digital Calipers Are Better Than Basic Rulers
A ruler is useful for rough dimensions, but digital calipers offer significant advantages.
- Higher precision
- Faster reading
- Internal and external measurement
- Depth measurement
- Easy unit conversion
- Zeroing for comparative work
- Compact and portable
For anyone needing accuracy beyond basic measurement, a caliper is a smart investment.
How to Read Measurement Values Correctly
Always verify:
- Unit selected (mm or inch)
- Decimal place shown
- Jaws properly contacting surface
- Object centered between jaws
Example:
- 25.40 mm = 1 inch
- 12.75 mm = precise metric reading
- 0.500 in = half inch
Reading carefully prevents costly mistakes.
Storage Recommendations
Good storage keeps your tool reliable.
- Use protective case
- Keep away from magnets and moisture
- Avoid extreme heat
- Do not place heavy items on top
- Store with jaws slightly closed
Small storage habits preserve calibration.
Safety Notes
Although a caliper is not dangerous like a power tool, safe handling still matters.
- Keep fingers clear when sliding quickly
- Do not use as pliers
- Keep away from children
- Do not expose electronics to water
- Use only for measuring
Buying Replacement Parts and Accessories
Depending on the model, useful accessories may include:
- Spare batteries
- Protective case
- Cleaning cloth
- Calibration gauge blocks
- Storage pouch
Having accessories improves convenience and maintenance.
Why Users Search for Louisware Digital Caliper Manual PDF
There are several reasons people look for this phrase online.
- Lost original booklet
- Need battery instructions
- Need zero calibration help
- Want inch/mm instructions
- Display issue troubleshooting
- Learning how to measure correctly
- Checking specifications before purchase
This guide serves those same needs in an easy-to-read format.
Final Thoughts on Louisware Digital Caliper Manual PDF
The keyword louisware digital caliper manual pdf reflects a practical need: users want clear instructions for getting the best results from their measuring tool. A Louisware digital caliper is versatile, precise, and easy to use when you understand its controls and functions. By learning how to zero the display, switch units, measure correctly, replace batteries, and maintain the device, you can use the tool confidently for years.
Whether you are measuring metal parts, household items, jewelry pieces, wood panels, or mechanical components, a digital caliper can save time and improve accuracy. Keep it clean, store it safely, and practice consistent measuring technique. With the right knowledge, your Louisware caliper becomes one of the most valuable tools in your workshop, toolbox, or workspace.
Also Read: The Small Business Time